Thursday, January 27, 2011

Sunny Lemon

Salut les filles :)))

Wow... New York is snowed in and life is officially on hold. To those of you who are lucky to be in a warm climate right now, please have a drink for me--Nastenka!!! In honor of tropical climates, warm weather and birthday girls :) my makeup look of the day is inspired by Fun in the Sun. Hope you all enjoy, and please don't forget to VOTE in my POLL on the right side bar. Merciii!!!

bisous,

Maryam Maquillage


ABOUT THE LOOK: Wearing bright eyeshadows is a great way to add a pop of color to your face and to brighten your mood :)) Achieving this look is easy and doesn't require a lot of steps or technique. You can do this look with any two complimentary eye shadows, doesn't have to be yellow and orange. Any bright combo will produce the same EyE PoPpiNg effect--try pink and purple, turquoise and blue, green and yellow... whatever. Just make sure the lid color is the brighter and lighter of the two.

FACE: Add bronzer across your forehead and nose and on the tops of the cheekbones. I like Bare Minerals Warmth (shimmery) and Benefit Hoola Bronzer (matte). Add a light gold highlight to the tops of the cheekbones and around the eyes, on the temples. My favorite highlighter is Nars Albatross... it is just divine.


EYES: You'll need a bright yellow shadow and a orangey-peachy shadow or blush. I used blush for this part. For your tools, you will need 2 brushes--a flat eyeshadow brush for application and a fluffy dome shaped brush for contouring and blending. For pictures and descriptions of the brushes, go to my post Fabuleyes. To define the eyes, you'll need your favorite black liquid or gel liner. If pencil works for you, go ahead and use that :))
  1. Prime your eyes with a good primer like Urban Decay primer potion. Wait for it to set and apply a second base if your yellow eyeshadow isn't very pigmented. If your eyeshadow is good quality, you can skip this step.
  2. The second base should have a sticky/oily consistency. I like to use NYX jumbo eye pencil, and for this look I used their white pencil in Milk. White base will make any bright shadow appear brighter. Apply the base to your lid only, staying under the crease, and blend out with your finger.
  3. Take your flat brush and pack on the yellow shadow all over your lid, over the second base, (if you chose to apply that).
  4. With a fluffy dome brush, take your orange eyeshadow or blush and apply it to your crease using windshield wiper motions. The yellow and the orange will blend together.
  5. Take your liquid eyeliner and line the top lid heavily, extending the line to a wing. Apply a coat of mascara and VOILA--you're done!!! (In the pic, I'm wearing individual lashes, so I didn't apply mascara)
LIPS: For a bright eye look, keep the lips neutral. I lined mine with NYX lipliner in Natural and applied MAC amplified creme lipstick in Warm Me Up. This color is unfortunately discontinued, but check out MAC's amplified formulas, they are awesome. They really plump the lips, making them look velvety :)))


LIFE IS GOOD!!!

HAPPY BIRTHDAY NASTYA!!!


Wednesday, January 26, 2011

Everyday Smokey

Salut mes cheries!!!

Happy Wednesday, hope you're all still warm and healthy. I'm feeling a bit scratchy in my throat, so I'm drinking hot tea with lemon and gargling with warm water and baking soda... yummy :/ Tonight, I'm making myself a special concoction, which I learned from my Russky bff: 1/3 honey, 1/3 lemon and 1/3 vodka. If you're feeling like you're about to catch something, try this "cocktail"-- it works better than Theraflu. My throat is always super sensitive and I'm constantly battling with it... my bf thinks it's stress related as I am about to start my final school semester. Whatever it is, I gotta nip it at the bud, so I'm keeping positive and happy while trying to stay warm.

Today, I wanted to show you guys my makeup look from this Sunday... it was a simple, everyday mini-smoky eye paired with pinkish nude lips and rosy cheeks. I wore the look to a kiddie party and would recommend it for any informal or formal daytime occasion. Basically, this is a super easy look to achieve and anybody, even a beginner, can recreate it on themselves. Hope you enjoy!!

bisous,

Maryam Maquillage

P. S. Please vote in my POLL on the right sidebar :))


ABOUT THE LOOK: In the winter, I like to use warm shades on my eyes and cheeks, even if it's for every day. For the face, I used my typical makeup routine: Laura Mercier mineral foundation primer (the best primer for mineral makeup ever), Lancome Maquicomplet concealer in medium bisque under my eyes, around the nose and on any blemishes, and my Bare Minerals matte foundation in golden medium. I also swept some Benefit Hoola bronzer across my forehead, nose and cheeks. 

Tip: To fake a tan, apply your bronzer to areas where you would normally highlight: across the forehead, down the nose and on top of the cheekbones. You can use shimmery bronzer if you want, but I still prefer matte for the winter. 


EYES: For the eyes, you will need just 3 eyeshadows: a matte chocolate brown, a lighter matte soft brown or tan (couple shades darker than your natural skin tone), and a frosty pink or nude color. You'll also need a brown eyeliner and black mascara. You'll need 2-3 brushes--smudge brush, contour fluffy brush, and an angled fluffy brush (optional). For pictures and detailed descriptions of these brushes go to my post Fabuleyes.
  1. Line the bottom waterline with the brown liner. I used Urban Decay 24/7 pencil in whiskey because it's waterproof once it sets.
  2. Extend the line outside of the waterline, creating an outer wing and line the outer half of your upper lash line. Don't line under the eye.
  3. Take your smudge brush and a matte chocolate brown shadow and smudge the top liner and the wing your just created. Smudge it up and out and also inwards toward the center of the lid. I used Too Faced eyeshadow duo in Sexpresso
  4. Take the remaining color on the brush (do not add more shadow) and line very gently under the lower lash line, stopping halfway in.
  5. Take a fluffy dome-shaped (contour) brush and apply the medium brown color following the contour of your eye socket. Use windshield wiper motions and make sure to tap off the excess color from the brush. This look is about soft smokiness, so there can't be any harsh lines. 
  6. Take the smudge brush and a little more dark brown and go over the upper lash line once more, then repeat step 5. I do these two steps about 3 times until I achieve the smokiness that I like.
  7. Take an angled fluffy brush or just clean your dome brush and apply a frosty nude color to your brow bone and to the rest of your lid (inner two thirds). I used the color Peach Fuzz (a peachy nude with gold glitters) from the same Too Faced eyeshadow duo. These eyeshadows are absolutely fantastic, I love this duo for everyday.
  8. Curl your eyelashes and apply two coats of Black Mascara. My favorite is L'Oreal Voluminous in Carbon Black. I dare not spend over $5 on mascara, ever...
Too Faced Eyeshadow Duo Sexpresso & Peach Fuzz


I used Ardell half lashes to complete the look, but you obviously don't have to. I like these lashes because they give me an extra cat eye lift. I use Duo lash glue in dark tone, that way you don't have to conceal it :)) My eyebrows are filled in ever so slightly, only in areas where my brows are sparse. I use a gray eyeshadow to fill them in because my brows are black and then I brush it out with a spoolie.


I look really weird in this pic because the camera angle distorted my features. My nostrils are super flared... yikes!!! No me gusta... but the lip color came out very true to life ;)
Anyways, I added some pink blush on the apples of my cheeks to warm them up and sprayed some MAC Fix + on my face to settle the makeup. On my lips, I'm wearing NYX lipliner in Natural--my everyday go to lipliner--and NYX lipgloss in Beige. I don't know why it's called Beige, it's really a muted pink, but whatevs... Also, I'm really not crazy about the smell of this lipgloss, it smells like cheap fake cherry and I just can't stand it... the colors and the quality of NYX glosses are awesome, but the smell could definitely be upgraded. Alrightie, short blog, let me know what you think, and PLEASE VOTE IN MY POLL on the TOP RIGHT sidebar. Merci a tous!!!


Tuesday, January 25, 2011

Eye-browsin'

Cheers Friends!!!

Hope you're all happy, healthy and warm :))) As you can tell, my poll for the Golden Globes celebrity makeup has been closed and I can now officially announce that the look worn by Jennifer Lopez has won by a landslide and I will be recreating it for this weekend. Yaaayyyy!!! Also, please vote in my new opinion poll, I really want to make this blog as accommodating as possible and address your interests and requests. So far, my blog topics have been about makeup looks and trends that interest me, but as I'm getting more readers, I want it to be about you as well :)) With that said, I hope you find my topic of the day interesting and insightful.

So... Today's post is about the eyebrows... ta-daaaa!!! I chose to talk about eyebrows because people often ask me about how I do mine and if they're my friends, I usually end up doing theirs. On top of that, I'm also someone who tends to pay a lot of attention to my brows and the brows of other people. For some reason, it's one of the first things that I notice on a person's face and the image never leaves my memory. Needless to day, I think the eyebrows are muy importante and happen to be one of my favorite facial features to blab about. So let's get the blabbing started!!!

bisous,

Maryam Maquillage


MY EYEBROWS are naturally arched and black. I've never waxed, dyed, threaded or shaved my eyebrows, and I've stuck with tweezing ever since I started at around 12-13. Back then I sometimes didn't know when to stop tweezing, so my brows went through a number of transformations over the years. At 15, my eyebrows were so thin and so arched that you probably wouldn't even recognize my face. Check it out lol... 


I was probably around 16 in this pic. Notice how naked the inner portion looks... that's because I worked super hard at getting rid of my slight unibrow. I also liked to use eyebrow gel to keep my brows super shiny and hard. A couple of years later, I went through another brow phase:


For the next few years, I struggled back and forth between thick and thin eyebrows, finally settling on something in between, closer to my natural thickness and shape. I find that my current eyebrow shape is the easiest to maintain. I pluck rarely and still get compliments :)


Personally, I think the eyebrows are just as important as the eyes and can really play up your features and frame your face even better than a haircut. A lot of people tend to treat their eyebrows as secondary features to eyes, neglecting their importance and failing to make the most of its purpose. In such cases, the eyebrows downplay the features. Check out these two celebrity examples:


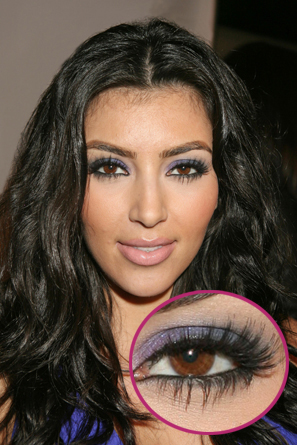
1. My favorite celebrity eyebrows to watch are Kimmy K's... When we first met Kim, her boldly rocked thick brows quickly turned into a trend among those Juicy Couture ladies we now refer to as the Jersey Shore. Kim's eyebrow shape is typical middle eastern--thick and closely set. I personally like her eyebrows slightly thinner and more rounded, as in the second photo. I think it was sort of necessary for her to change her eyebrows so that they can work better with her very dark and extra long lashes. What do you guys think of Kimmy's brow transformation??


Another celeb to go from messy to clean eyebrows is J. Lo. Take a look at her 2 eyebrow looks:

Here she is looking bushy (and a bit aged?)

and here she is again, looking squeaky clean. 

In both cases, we can see how changing the eyebrows can change the whole appearance of the face and eyes. Keep this in mind when you decide to change the shape of your brows. 


FAVE CELEB THICK BROWS: I love thick eyebrows on those who can pull it off and still look modern. Sure, 80's brows are hot, but in 2011--we have to give them some shape. My award for best Modern Thick Brows goes to Modern Family's Sofia Vergara. This is not a look for everyone, but because Sofia's brows are light and the hairs are fine, she pulls it off well. Imagine the same shape on dark brows like Kim K's...


FACE CELEB THIN BROWS: Thin brows work best on women whose eyebrows are naturally thin and don't require a lot of pulling and tugging. If your eyebrows are thick like mine, this is probably not a good look for you, unless you're going for that 90's chola look, as I did in my teenage years. My award for best Modern Thin Eyebrows goes to Nicole Schzwrtsenburger--Pussycat Doll. Her brows are perfect for her rounder face and frame her eyes beautifully.


FAVE BLONDE EYEBROWS: Ladies, ladies, ladies (and gents)!!! A quick disclaimer: DO NOT DYE YOUR EYEBROWS EVEN IF YOUR LIFE DEPENDED ON IT!!! Also, DO NOT BLEACH YOUR EYEBROWS!!! Your eyebrows will never be the same. NO, they will not grow back and YES, they will fall out. In addition, blonde or light brows should not be filled in with a black pencil. Once again, you will look like a chola, at best. To thicken or to darken blonde eyebrows, use a light brown pencil or shadow on an angled brush, fill in sparse areas, and comb through with a spoolie. My award for best Natural Blonde Brows goes to Scarlett Johansson. To make her brows pop, her makeup artist underlined them with a white pencil, which is a great trick to make them appear fuller and darker.


Her eyebrows are light but still very defined.


FAVE STRAIGHT BROWS: If your eyebrows don't have a natural arch, this is the look for you. Don't bother arching your brows if you can't, just keep them trimmed and tamed with brow wax or gel. I absolutely cannot shape my eyebrows to grow straight, and that's probably why I like this shape so much. My award for best Straight Brows goes to Jessica Alba.


CELEB FREAKY BROWS

Matching her brow color to her eye color...?

Freaky Christina

Megan Fox as Chola...


The Mother of All Mothers--Lil' Kim... ::shrugs::


Related Posts Plugin for WordPress, Blogger...